Mastering the Art of the “High-Angle” Shot: Gravity’s Deception
You’re standing on a rooftop in Portland let’s call it the Burnside Bridge overlook camera in hand, pointing straight down at the street below. The people look like ants. The cars look like toys. And your first instinct is to fire away, because this angle feels cinematic, feels powerful, feels like something.
Then you get home, pull the shots up on your monitor, and they’re… flat. Lifeless. The very thing that felt so dramatic in person has somehow evaporated from the frame.
That’s the trap of the high-angle shot. And almost nobody talks about why it happens.
What “High-Angle” Actually Means (And What Most Photographers Get Wrong)
Here’s the thing a lot of people use “high-angle shot” and “bird’s-eye view” interchangeably. They’re not the same. A bird’s-eye view is straight down, perpendicular to the ground. A high-angle shot is any elevated perspective where the camera is angled downward toward the subject, but not necessarily at 90 degrees. That distinction matters more than it sounds.
The high-angle shot is fundamentally about power dynamics. In film theory, shooting from above makes a subject look smaller, more vulnerable, less in control. Orson Welles knew this. So did Kubrick. When you point a camera down at someone, you’re making a visual argument about them.
But in photography especially landscape, street, and architectural photography most people skip right past that psychological dimension and just think: higher equals better view. That’s where the wheels come off.
The Physics of Depth Compression at Elevation
When you climb higher and angle down, something sneaky happens to your image. Depth compression kicks in hard. Objects that are far apart in the real world start stacking on top of each other in your frame. The foreground and background lose their separation. Everything flattens.
This is gravity’s deception. The scene below you looks rich and layered to your eyes because your brain is doing a lot of work to reconstruct the three-dimensional space. Your camera doesn’t have a brain. It just records light hitting a sensor, and from up high, that light arrives at angles that collapse the very depth you thought you were capturing.
I learned this the hard way in 2019 when I spent an entire afternoon on a fire escape in Chicago’s River North neighborhood, convinced I was getting killer street shots. I was shooting at around 35mm, angled down at maybe 45 degrees. Every single frame looked like a bad tourist photo. The people I was photographing looked like cardboard cutouts. There was no story in any of it. I’d been so seduced by the elevation that I forgot to think about the image.
The Three Variables That Actually Control Your High-Angle Shot
So what separates a high-angle shot that works from one that just looks like you climbed a ladder? It comes down to three things, and they interact in ways that aren’t always obvious.
Angle of Declination
The steeper your downward angle, the more you’re fighting compression. Somewhere between 20 and 40 degrees off horizontal is often the sweet spot high enough to feel elevated, shallow enough to preserve some sense of depth in the frame. Go past 60 degrees and you’re basically making a map, not a photograph. Maps can be beautiful, sure, but they’re not usually what you’re after.
Focal Length and Its Counterintuitive Role
Here’s the part that trips people up: wide-angle lenses don’t automatically save you. Yes, a 24mm lens exaggerates perspective and can restore some of that depth compression but it also distorts the edges of your frame dramatically when you’re shooting downward. Subjects near the corners start looking like they’re falling off a curved earth.
A moderate telephoto something in the 70 to 135mm range can actually work better for high-angle shots in many situations. You’re compressing the scene intentionally, making it look dense and layered in a purposeful way rather than accidentally flat. It’s a different aesthetic, but it’s a controlled one.
But honestly? I’m not sure there’s one right answer here. It depends on what the scene is doing, what the light is doing, and what you’re trying to say.
The Subject Anchor
This one’s underrated. Every high-angle shot that actually works has something in the frame that anchors the viewer something that gives the image a sense of scale and entry point. Without an anchor, the viewer’s eye floats around the frame and finds nothing to hold onto.
In street photography, that anchor is usually a person. In architecture, it might be a doorway or a vehicle. In landscape work, it could be a shadow falling across a specific texture. The anchor doesn’t have to be big. It just has to be there.
When Gravity’s Deception Works in Your Favor
There’s a counterintuitive argument to be made here: sometimes the flatness is the point.
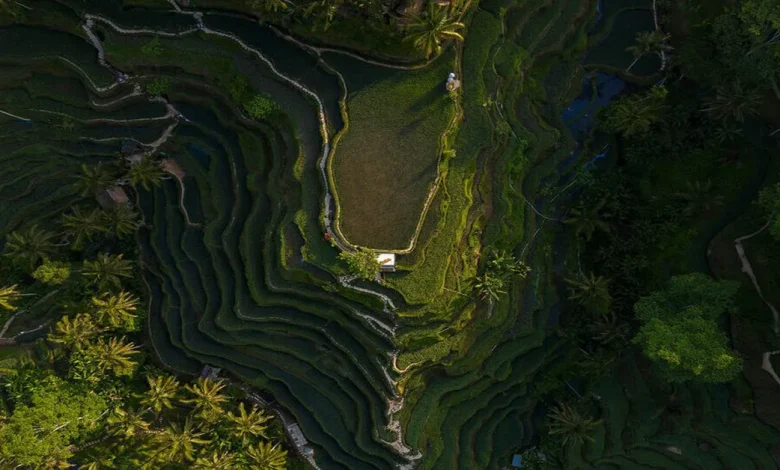
Think about the overhead shots of parking lots, swimming pools, or tile patterns that flood Instagram. They work precisely because they embrace the compression. They’re not trying to create depth they’re creating abstraction. The high angle strips away context and turns the world into geometry and color.
This is a legitimate artistic choice. The mistake is stumbling into it accidentally and then pretending you meant to do it.
If you’re going for abstraction, commit to it. Go full bird’s-eye. Pick a subject with strong graphic qualities repetitive patterns, high contrast, clear shapes. The flatter the better. Shoot straight down and own it.
If you’re going for drama and depth, you need to fight the compression actively. Choose your angle, your focal length, and your anchor with intention.
Practical Technique: Working the High-Angle Shot on Location
Let’s say you’ve found your elevated position. You’re on a parking structure, a hillside, a hotel balcony. Here’s how to stop wasting frames.
Start by not shooting immediately. Spend two minutes just looking. Where is the light coming from? What’s moving in the scene below? Is there a natural line a road, a river, a shadow edge that could lead the eye through the frame? You’re looking for the shot before you take the shot.
Then think about your anchor. Find one element in the scene that you want to be the emotional center of the image. Everything else in the frame should support that element, not compete with it.
Adjust your angle of declination before you adjust anything on your camera. Move your body. Lean out. Crouch down. The physical angle is your first and most powerful compositional tool, and most people ignore it completely in favor of fiddling with settings.
Finally and this is the thing I wish someone had told me earlier bracket your focal length if you have a zoom. Take the same composition at 35mm, 50mm, and 85mm. You’ll be surprised how different the same scene looks, and you’ll start to develop an intuition for which focal length serves which type of high-angle situation.
The Shot Nobody Talks About: The Transitional High-Angle
Here’s something worth chewing on. The most powerful high-angle shots are often taken not at the highest point, but at the moment of transition when you’re elevated just enough to see over the immediate foreground but not so high that everything collapses into a flat plane.
Think about a shot taken from the second floor of a building, looking out a window and down at a street corner. You’re above the action, but not detached from it. You’re still close enough to feel the texture of the world below. That intimacy-with-distance tension is where the real drama lives.
Can every high-angle shot achieve that? No. But knowing it exists changes how you look for it.
The next time you’re up high with a camera in your hands, don’t just point down and fire. Ask yourself what you’re actually trying to say about the world below you. Because the angle doesn’t make the image. Your intention does.